How to Use Canva? Guide for Beginners, Creators & Pros
If you’re reading this, you’re probably looking for the most complete canva guide for beginners on the internet — one that doesn’t skip steps, doesn’t assume what you already know, and doesn’t talk like a robot.
Good news: this is that guide.
People search how to use Canva every day, but what they don’t find is a walkthrough that actually explains every tiny detail — the stuff beginners really struggle with, the shortcuts pros wish they knew earlier, and the workflow creators use to design faster.
So whether you’ve never touched a design tool in your life or you’re the “make-a-poster-for-the-family-group” person, this canva guide for beginners will take you from your very first login to creating social posts, ads, thumbnails, and even pro-level branded designs.
Let’s start from zero and go all the way to expert — exactly how you wanted it.
1. What Is Canva ?
Canva is an online design tool where you can create anything — Instagram posts, resumes, logos, YouTube thumbnails, presentations, ads, banners, PDFs, reels, everything.
You don’t need design skills.
You don’t need fancy software.
You don’t need a powerful laptop.
This canva guide for beginners will walk you through it all.
2. Getting Started: Your First Login (For Beginners & Pros)
Before diving into how to use Canva step by step, let’s set up the basics:
Step 1: Sign Up
You can sign up using:
- Email
- Google
- Facebook
- Apple ID
Choose whatever’s fastest.
Step 2: Choose Your Purpose
Canva asks:
- Personal
- Student
- Teacher
- Small Business
- Large Company
- Nonprofit
Just pick one — it only helps suggest templates.
Step 3: Welcome to Your Dashboard
This is where most beginners panic. But don’t — the dashboard is just:
- Search bar (where the magic starts)
- Create a Design button
- Templates
- Your recent designs
- Folders
If you’re reading this as a creator or pro, this is also where your workflow begins.
You’ve now officially started your canva guide for beginners journey.
If you don’t know how to use canva for social media posts then stay with this blog at end you will know how to do it.
3. How to Use Canva Step by Step (The Real Walkthrough)
When someone searches how to use Canva step by step, what they really want is a simple path — and Canva makes it easy the moment you click “Create a Design.” As soon as you tap it, Canva asks you what you want to design, and this is where things become fun. Let’s say you’re planning something for Instagram. Canva already gives you all the right formats: the classic square Instagram Post, tall Story designs, the 1080×1920 Reel layout, and even ready-made carousel templates if you want multiple slides. The same magic applies everywhere. If you’re creating a YouTube thumbnail, Canva instantly gives you the perfect 1280×720 size. If you’re working on something offline, such as a poster, logo, flyer, or business card, you can also choose those formatsor simply enter your own custom dimensions.
Once your canvas opens, think of it as a ready-to-edit workspace. For example, if you picked a YouTube thumbnail, you can drag your photo, add bold text, adjust the colours, and resize elements with simple dragging. If you picked a Reel template, Canva lets you add vertical videos, apply transitions, include animated text, and decorate with effects and stickers. You’re not starting from scratch — Canva gives you a base, and you just customise it.
Here’s the simple flow beginners usually follow:
Step 1: Click Create a Design
Step 2: Choose the format (Instagram, Reel, thumbnail, poster, logo, etc.)
Step 3: Pick a template or start blank
Step 4: Replace images, text, colours, and elements
Step 5: Adjust everything until it matches your idea
Step 6: Download your design
And the download part matters the most. If you’re using Canva Free, you can download your design in PNG, JPG, and standard PDF — perfect for social media posts, thumbnails, simple videos, and everyday designs. But with Canva Pro, you unlock the advanced formats like transparent PNG (great for logos), print-ready CMYK PDFs, GIF exports, and HD or 4K video downloads. That means if you’re creating Reels, presentations, brand assets, or professional graphics, Canva Pro gives you every format you might need. Just tap Share → Download, choose your quality, and your design is ready.
Pro tip : If you’re a YouTuber or you own a YouTube channel, you can connect Canva to your account. This helps you avoid copyright issues — but note that you must be a Canva Pro user.
Step 3: Editing Tools (Your Control Center)
Below are short, one–two line explanations for each tool — with a quick example so that you know how to use canva in a better way.
Left sidebar
- Templates — Ready-made layouts you can start from; pick a template for an Instagram post, then swap in your photos and text to save time.
Example: choose a carousel template for a multi-slide Instagram tutorial. - Elements (shapes, icons, graphics) — Small design pieces you can drop into any layout to decorate or emphasize content.
Example: add a rounded rectangle behind text for contrast on a Facebook post, or use an arrow icon to point at a product. - Uploads (your photos, videos) — Drag in your own images, footage, or logos (from your pc) to keep designs on-brand and original.
Example: upload your product photo and replace the template image for a product announcement. - Text — Add headings, subheadings, or body text; presets help keep size and spacing consistent.
Example: use a bold heading for YouTube thumbnails and a smaller body font for Instagram captions inside a carousel. - Styles — Quick one-click colour + font combinations to give your design a consistent mood.
Example: apply a “minimal” style to make a promo post look clean and modern in seconds. - Photos & Videos — Canva’s library of stock media you can search and drop into layouts when you don’t have your own assets.
Example: search “coffee shop” and use a stock photo as the background for a cafe promo. - Magic Media : This is a new feature where you can create your own master peace by giving prompt.
- Audio : You can also add some music in your video or presentation if you want.
4. How to Use Canva for Social Media Posts (The Viral Section)
how to use Canva for social media posts
Here’s the simplified workflow:
Step 1: Choose the Platform Format
Instagram post = 1080×1080
Story/Reel = 1080×1920
Facebook = 1200×630
YouTube thumbnail = 1280×720
Canva gives these automatically.
Step 2: Pick a Template Based on Your Niche
Examples:
- Motivational quote post
- Carousel for tips
- Product promotion
- Announcement post
- Meme template
Step 3: Add Your Branding
- Upload your logo
- Use consistent colors
- Use the same typography
Step 4: Add Elements That Match Your Style
- Minimal icons
- Shapes
- Gradients
- Lines
- Creative borders
Step 5: Make It Stand Out
Use:
- Drop shadows
- Glow
- Grain overlays
- Photo filters
- Animation for reels/stories
And yes — all of this still fits inside your canva guide for beginners because even pros follow this structure.
Pro Tip :If you’re creating a carousel for LinkedIn, you can download all the slides using the PDF option. When uploading on LinkedIn, choose the “Document” option — this ensures your carousel displays in the correct format.
How to Use Canva Pro Features
This section will help you to know how to use canva pro features like magic eraser,Magic Expand,Blur option and more .
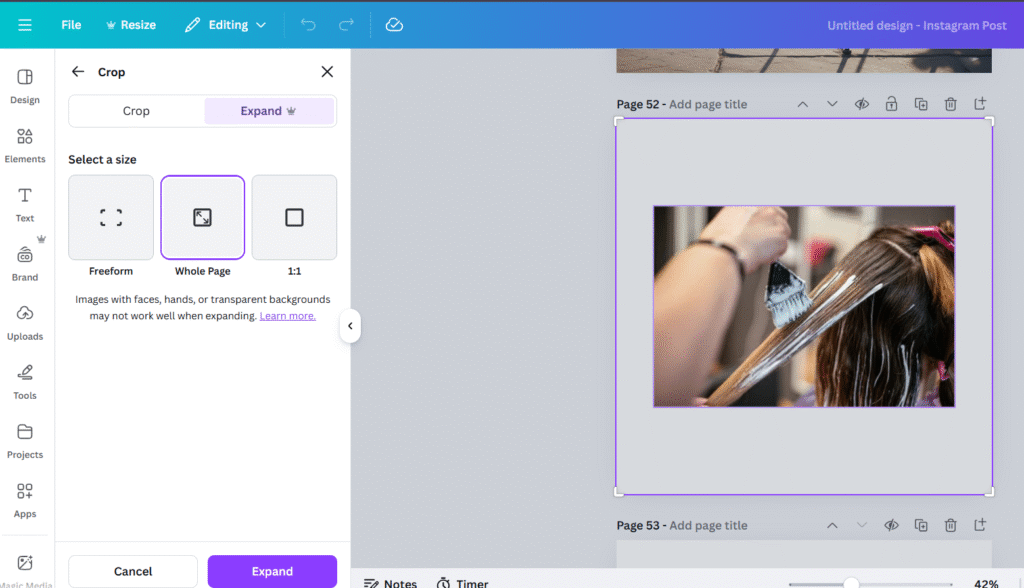

Magic Expand
Magic Expand helps you turn a small image into a full-page image. It can also convert a square image into a rectangle or vice-versa — extremely useful when creating visuals for ads or social media.
How to use it:
- Select the image you want to expand.
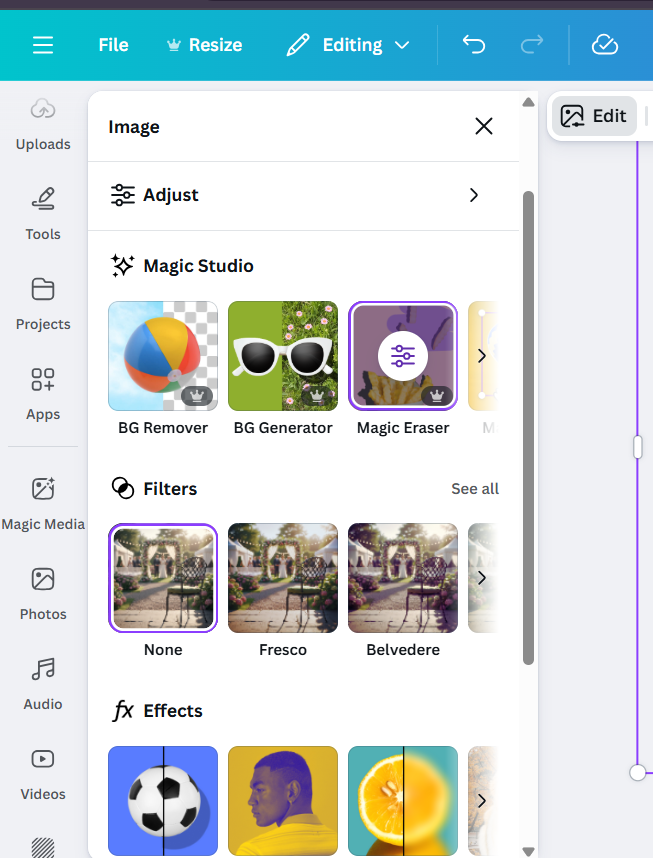
- From the top menu bar, click Edit.
- In the Magic Studio panel on the left, choose Magic Expand.
- You will get three options: Freeform, Whole Page, and 1:1.
- Select Whole Page.
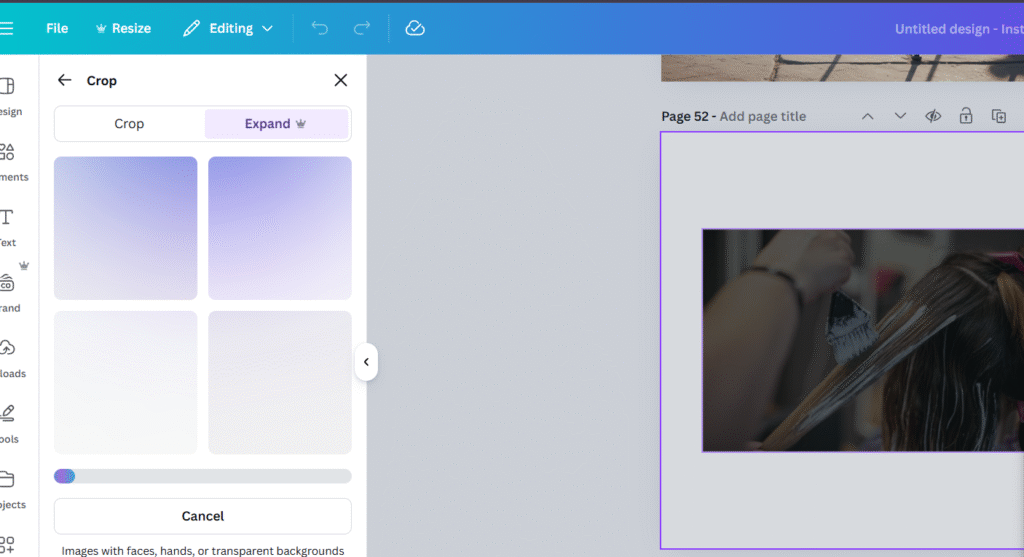
- Click Expand.
- Canva will generate 4 expanded versions of your image. Choose the one you like. (If you don’t like any, you can recreate them.)
- Click Done.
I use Magic Expand a lot when client images need resizing for ads or posts — it saves tons of time.
Magic Eraser
Magic Eraser helps you remove any unwanted object, product, logo, design, or element from your template.
How to use canva Step by Step Guide for Magic Eraser:
- Select your image or template.
- From the top menu bar, choose Edit.
(You can also access Magic Eraser directly from the top toolbar.) - In Magic Studio, click Magic Eraser.
- Adjust the eraser size from the left corner.
- Drag the cursor over the area you want to erase.
- Click Erase.
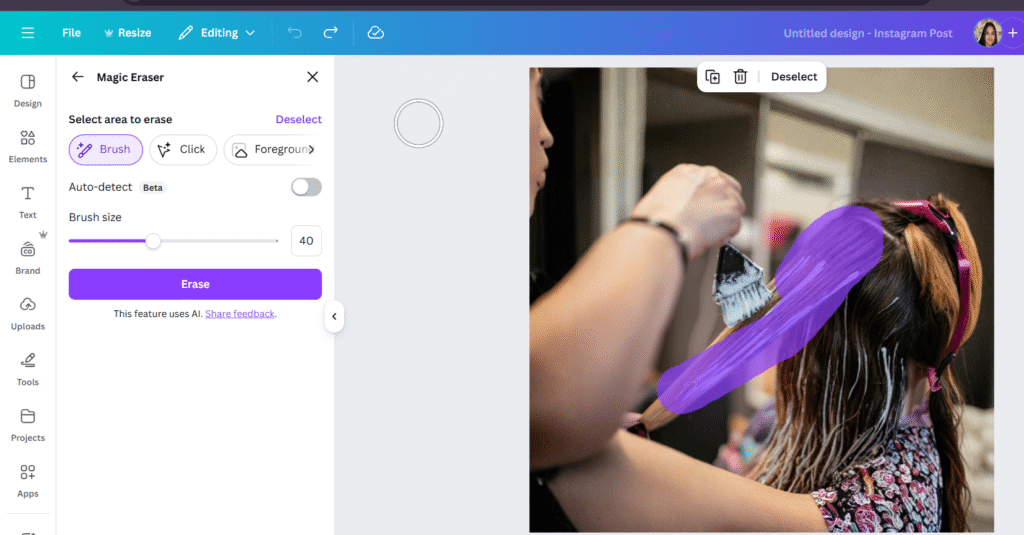
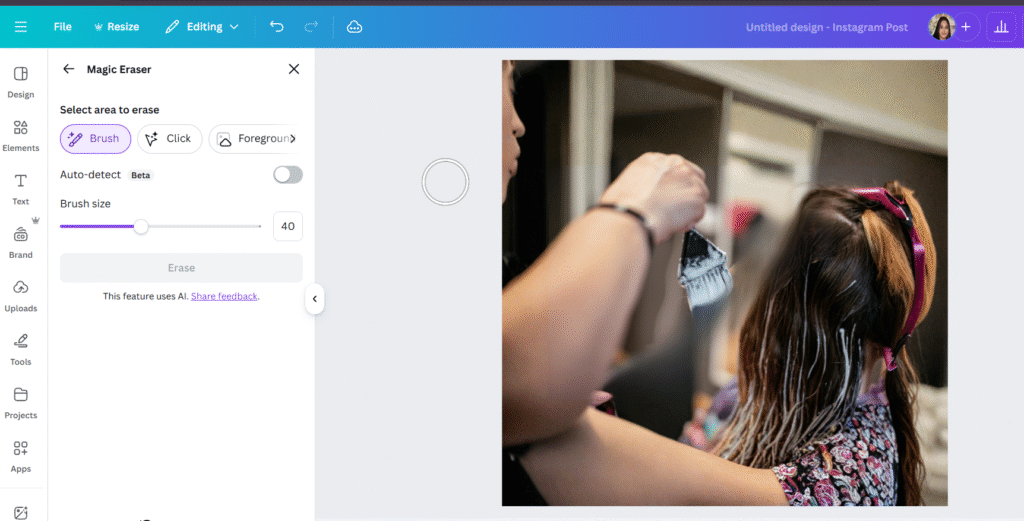
I personally use Magic Eraser to instantly delete unwanted items — logos, text, random objects — and it works incredibly well.
Blur Option
The Blur tool lets you blur any part of your image for creative effects.
How to use canva Step by Step Guide for Blur Option:
- Select your image or template.
- From the top menu bar, click Edit.
- Under Effects, select Blur.
- Drag the cursor over the area you want to blur.

I often blur certain sections and then place text over the blurred part — it creates a clean, aesthetic look.
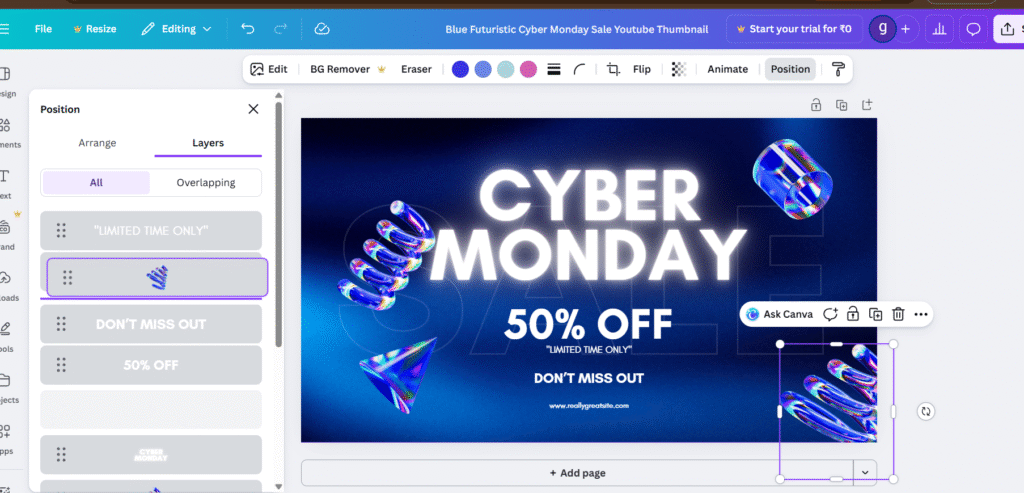
Other Useful Tools
Canva Pro and Free both come with many helpful options:
- Shadows – Add depth to images.
- Background Remover (Pro) – Remove backgrounds instantly.
- Background Generator (Pro) – Type a command and Canva generates a new background.
- Effects – Many creative options available for both free and Pro users.
- Transparency – Makes images or elements slightly faded; great for placing text on top.
- Corner Rounding – Helps you create soft, rounded corners for images or shapes.
- Positioning Tools – Align your logo, text, or images perfectly.
- Color Options – Huge variety for both text and background customization.
Canva truly makes work easier for freelancers, agencies, interns, or anyone creating content.
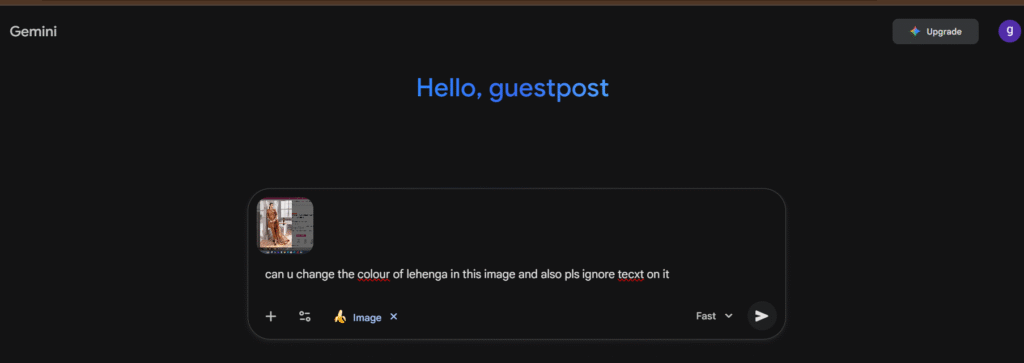
Nano Banana + Canva = Magic
Do you know how to use canva and Nano Banana together? If not, you’re missing out.
These two combined can save time, reduce effort, and still maintain high-quality output.
- Use Nano Banana to generate the exact image you want, or to create new backgrounds for your existing image.
- Just upload your image to Nano Banana and use the right prompt.
- After generating the image, bring it into Canva for final touches like adding logos, adjusting layout, or using Magic Eraser to clean up unwanted parts.
Pro Tip : For the perfect prompt, ask ChatGPT to create a Gemini-style prompt describing exactly what you want.
Copy that prompt into Nano Banana — and you’ll get high-quality, accurate results.
Final Tips: Design Like a Pro, Even If You’re New
To wrap up your canva guide for beginners, here are workflow secrets:
- Start with templates — always.
- Keep your color palette consistent.
- Don’t use more than 2–3 fonts.
- Use contrast: dark text on light backgrounds.
- Use grids to align everything.
- Export in PNG for best quality.
- Duplicate designs instead of starting fresh each time.
These are the same strategies creators with 100K+ followers use
Conclusion:
I know there are many design tools available in the market today, but one of the best and most widely used is Canva. Canva has also added AI features to stay ahead, and some of its Magic Studio tools really take your graphic skills to the next level.
If you are a beginner, start with the free version, and once you get comfortable, you can upgrade to Pro to advance your skills. This guide hopefully helps how to use canva. And if you’re already a graphic designer or an experienced Canva user but still struggle with certain designs, check the How to use Canva Pro Features section above — you will definitely find something that helps you create your masterpiece.
If you like the blog do like, comment and share. For more blogs like this, you can also subscribe to my website, it’s free. Guestpostlinkup.